Show original
Try the app

超ルッキズム診断
Enjoyed this article?
Support superlookism
Share
AI translation
Before redrawing your eyebrows, compare the shapes in photos. Using examples of straight brows and arched brows, with intensities at 100% and 200%, we'll show you everything from alignment to adding strokes with a brush to saving the image. No registration or app installation required.
Try the app
超ルッキズム診断
Enjoyed this article?
Support superlookism
How would straight eyebrows look? Do arched eyebrows suit my face? Before shaving or redrawing your eyebrows, I created a way to change the shape in photos and compare them.
The eyebrow simulation feature of "Super Lookism Diagnosis" is free to use from your smartphone browser. No registration or app installation required. You can adjust not just the eyebrow shape, but also the color, darkness, thickness, length, and height.
First, here's an example where only the eyebrow shape has been changed. The left shows straight eyebrows, and the right shows arched eyebrows. Both are brown with darkness, thickness, and length set to 100%, height set to 0, and lips and cheeks unchanged.
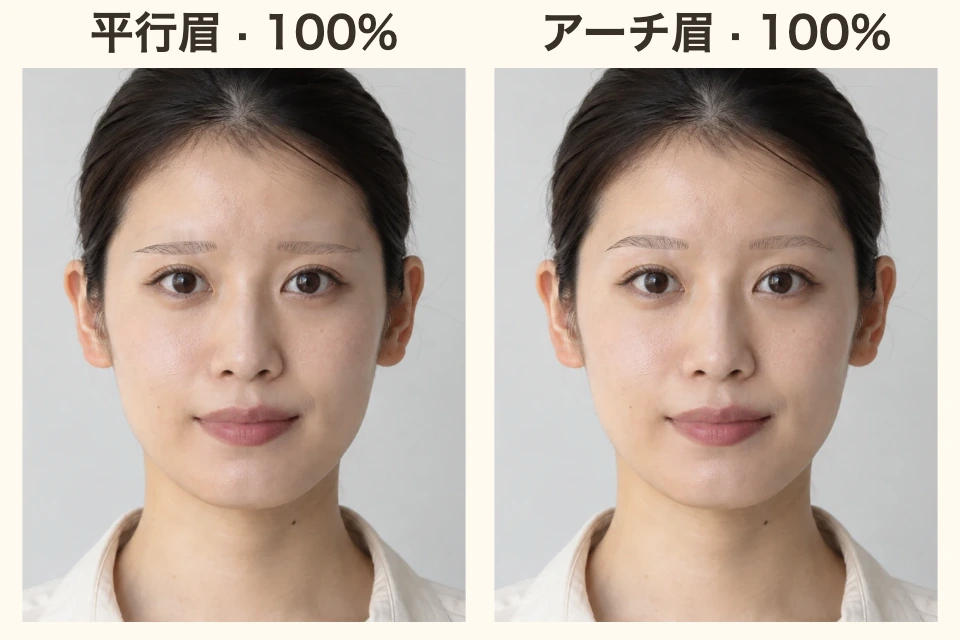 On the left, the upper line of the eyebrow is nearly horizontal, while on the right, there's a curve from the eyebrow peak to the tail. After switching the shape, rather than just zooming in on the eyebrows alone, return to viewing the entire face and check how the eyebrows combine with the eye area.
The person in the example is an AI-generated test photo. The eyebrow changes were made using the same image processing as the publicly available simulator.
Next, with the same arched eyebrows, only the darkness was changed from 100% to 200%.
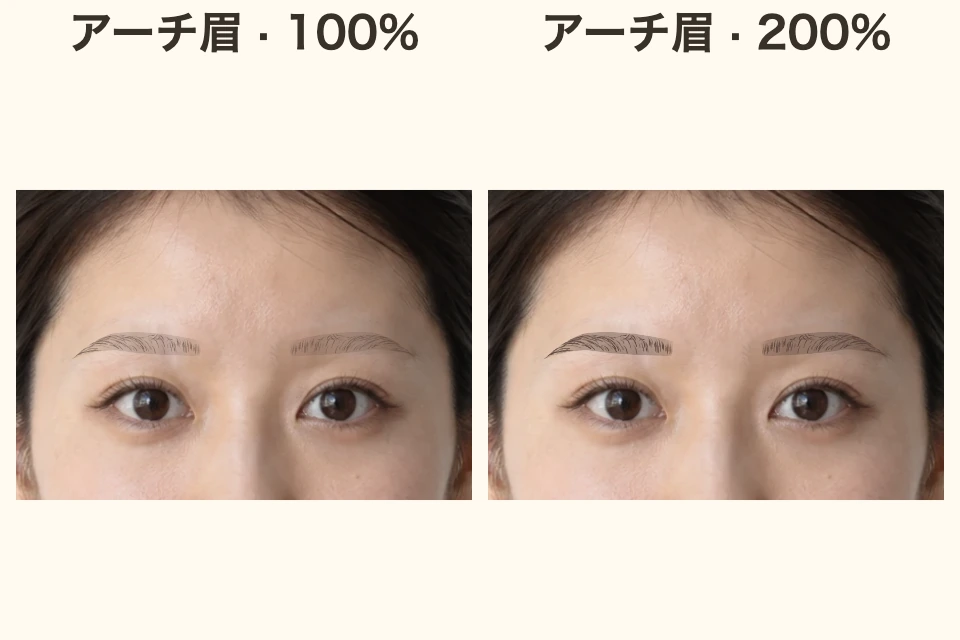 On the right, the hair flow lines become darker, and the eyebrow tail is more defined. The 100% on the slider is the standard setting, not the upper limit. You can move it gradually and compare it with your original hair color and eye area.
With "Draw with brush," you can add more with your finger or mouse. It uses the color selected in the eyebrows, and you can also change the color and thickness on the brush side. Zoom in on the area and trace where you want to add, such as the eyebrow tail.
If you draw too much, you can use "Undo" or the eraser to correct it. The eraser can only erase the hand-drawn parts. The saved image will include the parts drawn with the brush.
Check with "Align the position" to make sure the three points are not misaligned from the original eyebrows. Align the points with the original eyebrows, not the eyebrows you want to draw. If hair sticks out, slightly widen "the thickness of the range to hide original eyebrows."
If bangs or dark shadows overlap, the trace of where the eyebrows were hidden may become noticeable. In that case, it's recommended to try with a different photo where the eyebrows are visible.
This is not a feature to judge whether straight or arched eyebrows are the correct choice, but rather a tool to compare shapes in your own photo. First, try both shapes with the same photo and same darkness.
平行眉にしたらどう見える? アーチ眉は自分の顔に合う? 眉を剃ったり描き直したりする前に、写真で形を変えて比べられるようにしました。
「超ルッキズム診断」の眉毛シミュレーションは、スマホのブラウザから無料で使えます。登録やアプリのインストールは不要。眉の形だけでなく、色・濃さ・太さ・長さ・高さも調整できます。
まずは、眉の形だけを変えた作例です。左は平行眉、右はアーチ眉。どちらもブラウン、濃さ・太さ・長さは100%、高さは0に揃え、リップやチークは変えていません。
左は眉の上の線が横に近く、右は眉山から眉尻にかけてカーブが付いています。形を切り替えたら、眉だけを拡大して見るのではなく、顔全体に戻して目元との組み合わせも確認してみてください。
作例の人物はAI生成のテスト写真です。眉の変更は、公開中のシミュレーターと同じ画像処理で行っています。
次は同じアーチ眉で、濃さだけを100%から200%へ変えました。
右は毛流れの線が濃くなり、眉尻もはっきりしています。スライダーの100%は標準の設定で、上限ではありません。少しずつ動かして、元の髪色や目元と合わせて見比べられます。
「ブラシで描く」では、指やマウスで描き足せます。眉で選んだ色を使い、ブラシ側で色や太さを変えることもできます。部分を拡大して、眉尻など足したいところをなぞってください。
描きすぎたら「戻す」か消しゴムで修正できます。消しゴムで消せるのは手描きした部分です。保存画像には、ブラシで描いた部分も入ります。
「位置を合わせる」で、3つの点が元の眉からずれていないか確認します。点は描きたい眉ではなく、元の眉に合わせてください。毛がはみ出る場合は「元眉を隠す範囲の太さ」を少し広げます。
前髪や濃い影が重なっていると、眉を隠した跡が目立つことがあります。その場合は、眉が見える別の写真で試すのがおすすめです。
平行眉とアーチ眉のどちらが正解かを判定する機能ではなく、自分の写真で形を比べるためのツールです。まずは同じ写真・同じ濃さで、2つの形を試してみてください。
